2014 Chubbuck Kalliope 001 build in progress.
Hey! How have you been? I bet you thought this blog was dead. My apologies but I needed to take the year off and focus on the shop. But I assure you that I will be adding more content on a regular basis now.
If you did not know, I maintain another blog that I dub "On the Bench" that I've been keeping very up-to-date. Why two separate blogs? Well, I wanted to maintain the more in-depth articles here on this blog while having another outlet to do quickly-captioned single-photo updates of the work on my bench each week.
Love to wallow in the mire with details and geek out on shop? Stay here, this main blog is for you.
Like it light and breezy, quick and dirty? Then head to the On the Bench.
So far I've posted just about every repair with exception of three guitars on the Bench blog (though I will get them back in the shop for photos!!!). Also the Bench blog is mirrored over at Tumblr so if you are on there consider giving it a follow!
I know on one of my posts from last year that I set some goals: four guitar builds and having the spray booth up and running. In both respects, I failed miserably. The spray booth components are still stacked up in the corner, awaiting a solid plan-of-installation (ie. requiring more time, more money). I do have some leads of people that I hope will help me, but it is still a long, long overdue project. Though I did not get my four guitars built I have started on a couple acoustics. You can check the progress On the Bench and I will be adding some posts on here soon. Rogue 005's body is glued up along with a new jumbo model that is dubbed the "Kalliope". This Kalliope 001 is a 16" lower bout and the client requested an arm bevel and a soundport. I also have a couple hollowbodies that await my attention as well.

2014 Chubbuck Rogue 005 in progress.
Note that Rogue 005 is not spoken for as of this posting so please inquire if you are interested. Bearclaw Engelmann spruce top with Santa Maria Mahogany back and sides.
This year is very exciting as I am getting the build side of the shop up and running. Stay tuned!
: : : : : :
Ok, here is an output jack crack repair on an 80's Yamaha 335-style guitar. And yes, I said "output" jack - not the common "input" jack misnomer. For me, input jacks are for amps, output jacks are for guitars. The signal leaves the guitar and enters the amp, right?
This crack highlights why having repair experience feeds into building your own guitars. I always reinforce my output jacks in my builds for this very reason. The instrument cable is torquing the hell out of a small area of the guitar and over time something has to give. Many Gibson (ie. ES-175) with side jacks suffer this same crack and require some kind of reinforcement to be added when time comes for repair. But I get it - it is an extra step that adds expense in a factory environment. But in a small-volume build shop, I would highly suggest reinforcing the output jack.
This 1982 Yamaha SA 1200S has a solid spruce top, so it is particularly vulnerable to cracks that possibly a laminate top (plywood) could have withstood. So this will be photo-essay style from here on out. The basic plan of attack:
- remove the wiring harness
- glue the output jack crack
- reinforce the crack with cleats
- minor finish touch-up
- clean up / reinstall the wiring harness
- set up

1982 Yamaha SA 1200S “Super Axe” Note how far away the output jack is from the f-hole in which I’ll have to access to repair this crack!
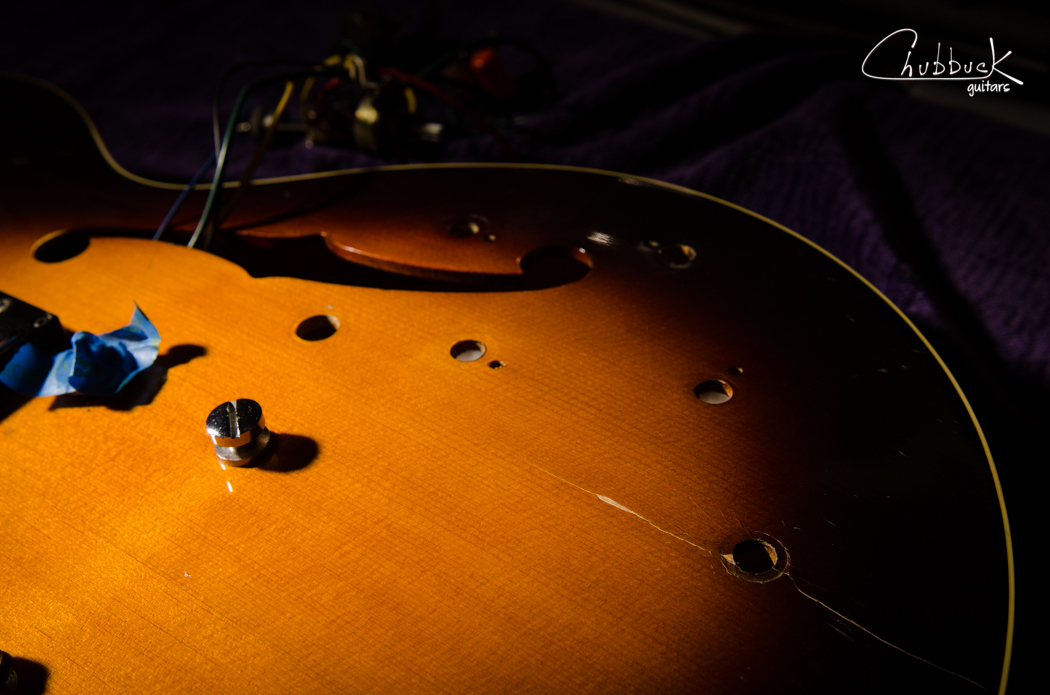
Solid spruce top with a 5″ long crack running from the binding and through output jack mounting hole. The wiring harness was extracted via the treble f-hole.

First the crack was stabilized by forcing glue down through the crack. The suction cup helps the glue penetrate through the crack by hydraulic pressure. The small dental mirror is used to monitor the glue squeeze-out inside.

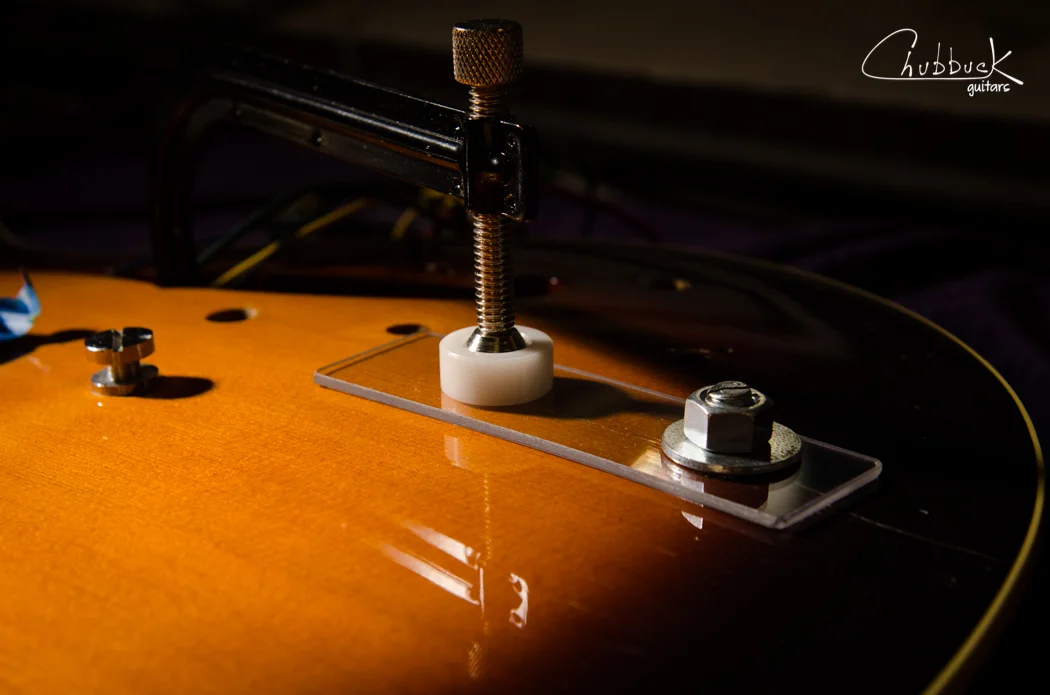
With the crack saturated with glue, I used a 3/8″ diameter bolt with two plexiglass cauls, a couple washers and a nut to clamp around the output jack. A small deep-throat clamp was then used through the f-hole to align the rest of the crack. More details on this clamping setup below. Note that if I get another one of these repairs that I would extend the length of the top caul to the edge- I was concerned the plexiglass was too stiff to fit into the recurve (it turned out to be flexible enough).
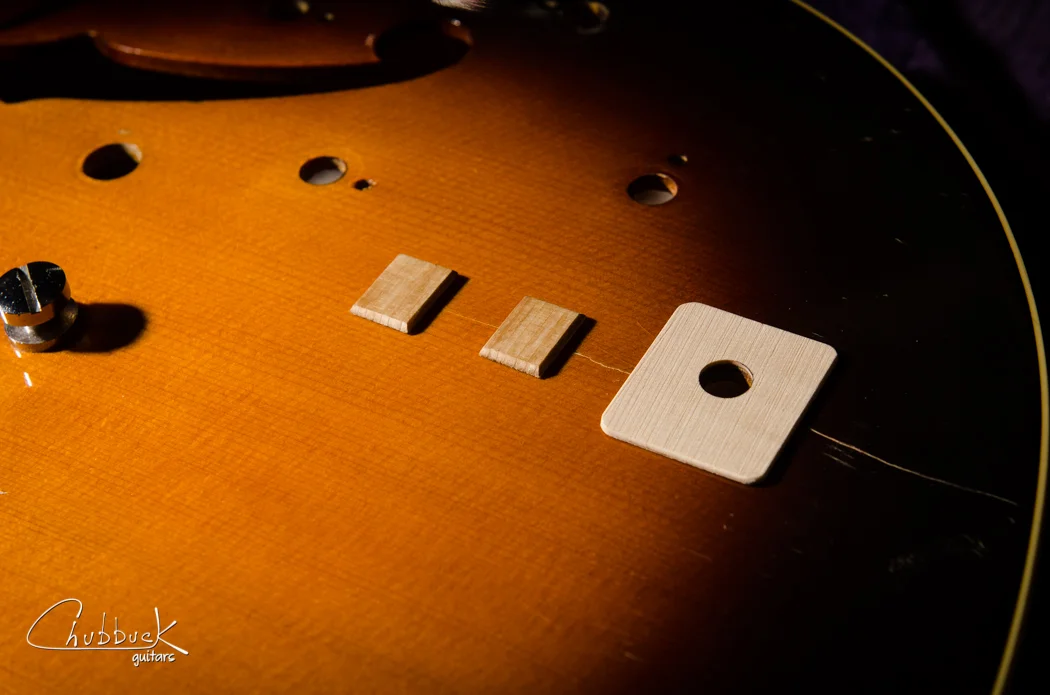
Now that the crack is glued, it needs to be reinforced. The larger jack reinforcement is made of maple while the smaller cleats are made from spruce. Note that I later decided to add a third spruce cleat between the output jack and the edge.

I wanted to make the output jack reinforcement cleat as thick as I could, but the danger here lies in making it too thick and not leaving enough room to fit the nut and washer on the jack when you’re done. I check the thickness by stacking the washer, nut and maple reinforcement on the outside and checking inside to see if the jack is just proud of the edge. The original jack was already a long-thread version so I used an identical thread-length jack to test here. Sure you could use the original to test this, but I didn’t want to disturb the wiring harness any more than was necessary.

Here is the breakdown of the clamping setup. It assembles from right to left. Bolt, washer, small plexiglass and maple reinforcement go inside the guitar. Large plexiglass, washer and nut go on the outside.
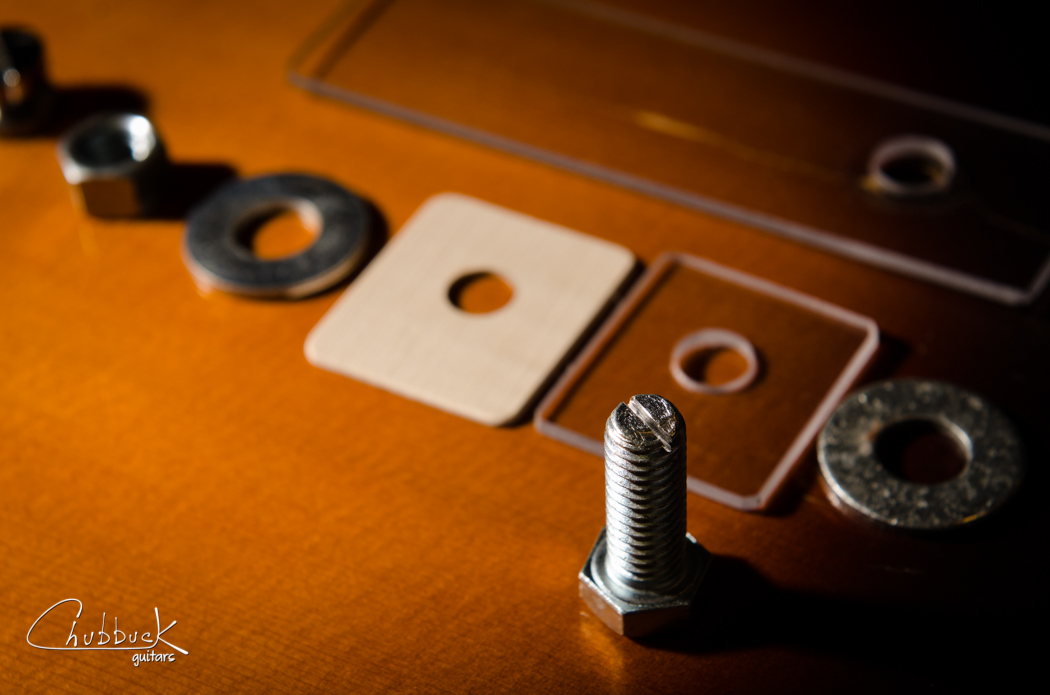
I cut a slot into the end of the bolt with a Dremel cutoff wheel so I could use a screwdriver along with a wrench to tighten it down later.

Here is the rig assembled. Note that I made a small mark on the maple reinforcement so that I could easily index it into the correct orientation when it came time to install (bass side versus treble side, perpendicular to the top grain).

So the trick is to get this bolt / washer / plexiglass / maple setup inside the treble f-hole and then over and up into the output jack. After applying glue to the reinforcement, I used a set of long tweezers to wrangle it into the f-hole and rested the bolt head on the back, inside the guitar. The other blue gizmo in the photo is just a couple magnets wrapped in cloth and taped up. I used this magnet on the exterior of the back to slide the bolt that is inside the guitar over to the output jack.

Now that the bolt / maple reinforcement are in position under the output jack, I needed a way to pull that bolt up through the top. Here comes in another larger stack of magnets. The bolt I used, while resting on the back, was not long enough to be attracted by these magnets. So I had to “throw” the bolt up into the magnets. I did this by raising the guitar up off of the bench and then lowering it abruptly. “Thump!” The bolt was now suspended by the top stack of magnets.

With the bolt now suspended by the magnets, I used the dental mirror to check its orientation inside the guitar and turned the magnet stack accordingly. When it was in the correct position (thanks to the mark I made earlier), I pulled up on the stack and brought maple reinforcement in contact with the top. The slotted screwdriver comes into play on the next step of securing the top side of the clamping rig.

With the magnet stack removed, make sure that the bolt does not fall back into the guitar or you will have to start over! I used the slotted screwdriver to hold the bolt in position while I assembled the exterior caul and washer. Once you get the nut started onto the bolt threads you are out of the woods.

This is where that slot I cut into the end of the bolt comes into play. I can tighten down the nut with a wrench and keep the bolt from spinning with a slotted screwdriver.

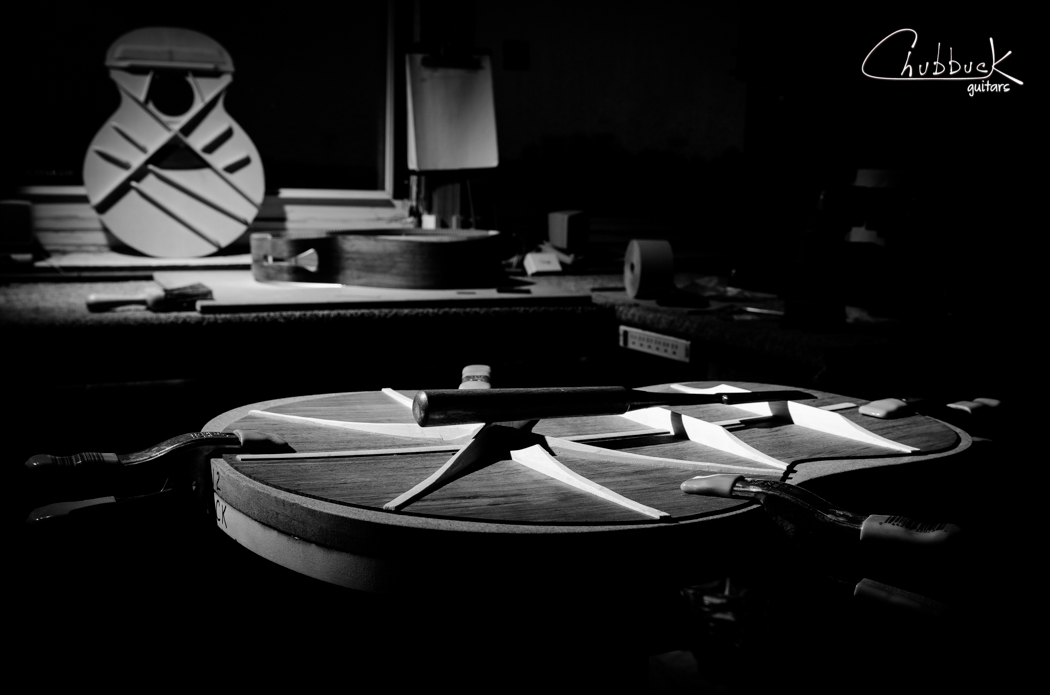
Now that the output jack is reinforced, time to reinforce the rest of the crack. Here are more magnets used to layout where each of the three spruce cleats will go. I use a piece of tape under each magnet stack to protect the finish. The dental mirror along with the small “light bulb on a stick” that I got from a violin supply house are great for working through the f-hole.
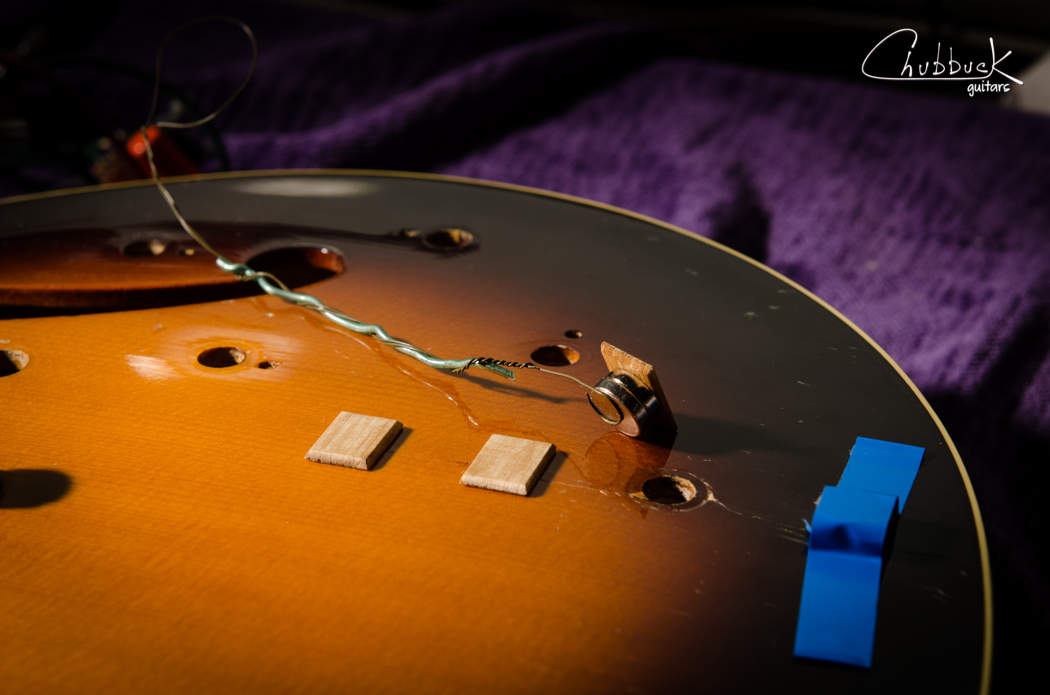
When I find the right position, I tape the exterior magnets down. In order to get the cleats inside the guitar, I use this goofy wire rig to reach in through the f-hole. I’ve used this on a violin before with great results. It is made up of thin military trip wire and a thicker piece of bonsai wire to stiffen a section of it. Double stick tape keeps the cleat on the magnet. Just make sure you get your polarities correct or the magnet will flip over on you inside the guitar when it comes time to install. I work from the farthest edge (right side in this photo) and work back to the f-hole, installing the cleats one by one.

The crack repair is now stabilized so it is time to reinstall the wiring harness. It was quite a mess so I took the time to zip tie various sections together to keep the appearance through the f-hole nice and clean (ie. – no wires visible). I also used some Deoxit to clean the pots which can become scratchy in hollowbodies since the “control cavity” is exposed.

Here is the completed repair. The finish is some sort of catalyzed finish (ie. NOT nitrocellulose lacquer) so I only did a minor color touch-up to take the curse off of some of the the stark white spruce that was exposed through the sunburst.
![Output jack crack repaired, wiring harness installed and set up for GHS Boomers 11-50]](https://images.squarespace-cdn.com/content/v1/53dfcee2e4b0c0da377c65c7/1407459939375-SOV4HIGPRBVDGRGFO6JK/yamaha_sa1200s_19.jpg)
Output jack crack repaired, wiring harness installed and set up for GHS Boomers 11-50]
And let me introduce you to the guitar's owner, Graham Kelly. He plays around Boston in the band Dig. I first met him last year at a gig while shooting photos at Johnny D's in Somerville, MA. I highly recommend you check them out if you are around Boston.
![Graham Kelly, guitarist of the band Dig playing Johnny D’s in Somerville, MA. [October 13, 2013]](https://images.squarespace-cdn.com/content/v1/53dfcee2e4b0c0da377c65c7/1407459990871-MUUAO7IWCKBVL42Y17N1/image-asset.jpeg)
Graham Kelly, guitarist of the band Dig playing Johnny D’s in Somerville, MA. [October 13, 2013]
I hope you enjoyed my first update here in over a year. Stay tuned as I will have more content coming soon, particularly some Chubbuck Guitar builds!
In the meantime, please check out the often-updated-multiple-times-during-the-week On the Bench.
Oh yeah, Instagram too.